Let me give you an overview of how we will proceed. We will install a new laravel application, make the database connection and pour some fake movies data into it. Afterward, we will create a model and a controller and bind it to view. Lastly, i will create a view and relentlessly add Bootstrap 5 and implement Select2 JavaScript CDN link to create an autocomplete search.
Install Laravel Application
First and foremost step begins with installing the brand new laravel application. Run the command to sustain the development process.
composer create-project laravel/laravel laravel-autocomplete-search --prefer-distNext, get into the project directory:
cd laravel-autocomplete-searchSkip this step, if you have already installed the app.
Configure Database
Add database name, username and password in .env file; it sustains the consensus between laravel and database.
DB_CONNECTION=mysql
DB_HOST=127.0.0.1
DB_PORT=3306
DB_DATABASE=laravel
DB_USERNAME=root
DB_PASSWORD=
MAMP user may get given below error while running the migration. Incorporate the following code after the database configuration in .env file.
DB_HOST=localhost;unix_socket=/Applications/MAMP/tmp/mysql/mysql.sockAdd some fake data that needs to be searched, go to PHPMyAdmin and run the following SQL query.
INSERT INTO `movies` (`id`, `name`, `created_at`, `updated_at`) VALUES
(1, 'Black Panther', NULL, NULL),
(2, 'Avengers: Endgame', NULL, NULL),
(3, 'Mission: Impossible - Fallout', NULL, NULL),
(4, 'Spider-Man: Into the Spider-Verse', NULL, NULL),
(5, 'Mad Max: Fury Road', NULL, NULL),
(6, 'Wonder Woman', NULL, NULL),
(7, 'Coco', NULL, NULL),
(8, 'Dunkirk', NULL, NULL),
(9, 'Thor: Ragnarok', NULL, NULL),
(10, 'Logan', NULL, NULL);
Model & Migration
Create a Movie Model that is generated by the following model command.
php artisan make:model Movie -mIn database/migrations/timestamp_create_movies_table file add the table values that you want to generate in database.
use IlluminateDatabaseMigrationsMigration;
use IlluminateDatabaseSchemaBlueprint;
use IlluminateSupportFacadesSchema;
class CreateMoviesTable extends Migration
{

    public function up()
    {
        Schema::create('movies', function (Blueprint $table) {
            $table->id();
            $table->string('name');
            $table->timestamps();
        });
    }

    public function down()
    {
        Schema::dropIfExists('movies');
    }
}
Create the app/Models/Movie.php and add the given values within the $fillable array.
namespace AppModels;
use IlluminateDatabaseEloquentFactoriesHasFactory;
use IlluminateDatabaseEloquentModel;
class Movie extends Model
{
    use HasFactory;
    protected $fillable = [
        'name'
    ];
}
Run the following command to run the migration.
php artisan migrateCreate Routes
We need to create two routes. Both the routes simultaneously load the search view and process AJAX dynamic search through select2 jQuery plugin to fetch the data from the database and display it to the user.
Add the below code in routes/web.php file.
use IlluminateSupportFacadesRoute;
use AppHttpControllersSelect2SearchController;

Route::get('/search', [Select2SearchController::class, 'index']);
Route::get('/ajax-autocomplete-search', [Select2SearchController::class, 'selectSearch']);
Create Autocomplete Search Controller
Create a controller by using the following command.
php artisan make:controller Select2SearchControllerIn controller file we will create two functions.
The index() method brings the autocomplete search in the view, and the selectSearch() function contains the logic to fetch the data from the database on matched text.
Insert the following code in appHttpControllers/Select2SearchController.php.
namespace AppHttpControllers;
use AppModelsMovie;
use IlluminateHttpRequest;
class Select2SearchController extends Controller
{
    public function index()
    {
    	return view('home');
    }
    public function selectSearch(Request $request)
    {
    	$movies = [];
        if($request->has('q')){
            $search = $request->q;
            $movies =Movie::select("id", "name")
            		->where('name', 'LIKE', "%$search%")
            		->get();
        }
        return response()->json($movies);
    }
}
Create View
Theoretically, we have reached almost the last step of this tutorial. First, create resources/views/home.blade.php file, then add the following code.
<!DOCTYPE html>
<html lang="{{ str_replace('_', '-', app()->getLocale()) }}">
<head>
    <meta charset="utf-8">
    <meta name="viewport" content="width=device-width, initial-scale=1">
    <title>Laravel Ajax Autocomplete Dynamic Search with select2</title>
    <link rel="stylesheet" type="text/css"
        href="https://cdnjs.cloudflare.com/ajax/libs/twitter-bootstrap/5.0.0-alpha1/css/bootstrap.min.css">
    <script src="https://ajax.googleapis.com/ajax/libs/jquery/3.5.1/jquery.min.js"></script>
    <link href="https://cdn.jsdelivr.net/npm/select2@4.1.0-beta.1/dist/css/select2.min.css" rel="stylesheet" />
    <script src="https://cdn.jsdelivr.net/npm/select2@4.1.0-beta.1/dist/js/select2.min.js"></script>
    <style>
        .container {
            max-width: 500px;
        }
        h2 {
            color: white;
        }
    </style>
</head>
<body class="bg-primary">
    <div class="container mt-5">
        <h2>Laravel AJAX Autocomplete Search with Select2</h2>
        <select class="livesearch form-control" name="livesearch"></select>
    </div>
</body>
<script type="text/javascript">
    $('.livesearch').select2({
        placeholder: 'Select movie',
        ajax: {
            url: '/ajax-autocomplete-search',
            dataType: 'json',
            delay: 250,
            processResults: function (data) {
                return {
                    results: $.map(data, function (item) {
                        return {
                            text: item.name,
                            id: item.id
                        }
                    })
                };
            },
            cache: true
        }
    });
</script>
</html>
We import the Bootstrap 5 beta version to use the custom UI component to spruce up the UI. We are also implementing the select2 jQuery plugin CDN link inside the head part of the template.
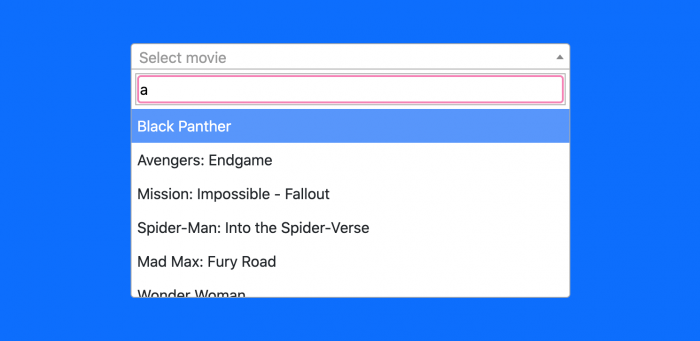
Test App
Finally, we have gone through each and every imperative respectively. Now, Its time to test out what we have built.
Run the following command to start the laravel app.
php artisan serveOpen the following URL in the browser:
http://127.0.0.1:8000/search